


5 Levels of Ureteric Dissection : A Guide for Gynaecs
Gynaecs always taught you to stay away from the ureter. Not anymore.


The light scent of ever-lingering formaldehyde weighed on everyone who entered our OT in Smt. NHL Municipal Medical College. Amongst the highest load bearers of the city, our department of gynaecology once saw almost 32 deliveries in less than 24 hours. This meant that we were wired to be efficient. Everything had to be fast, and there was no time for second thoughts. No time for mistakes. It was trial by fire.

So we had rules. Rules about things that we must not do, especially while operating. The most important of which was, “That’s the ureter. Stay away from it”. The ureter was the urologist’s problem. We are gynaecologists. We don’t touch ureters, we just put blinders on and snip around the uterus. And that worked fine for the most part. Life was good until the day I saw my first frozen pelvis.
At Mayflower, we’re compelled to fight back with intense involvement no matter where it may be. So contrary to what gynec-school taught me, I learnt to deal with the ureter in a way that is both curative and restorative. That’s what gave birth to the thesis that we break down today.

The Hesitant Ureter
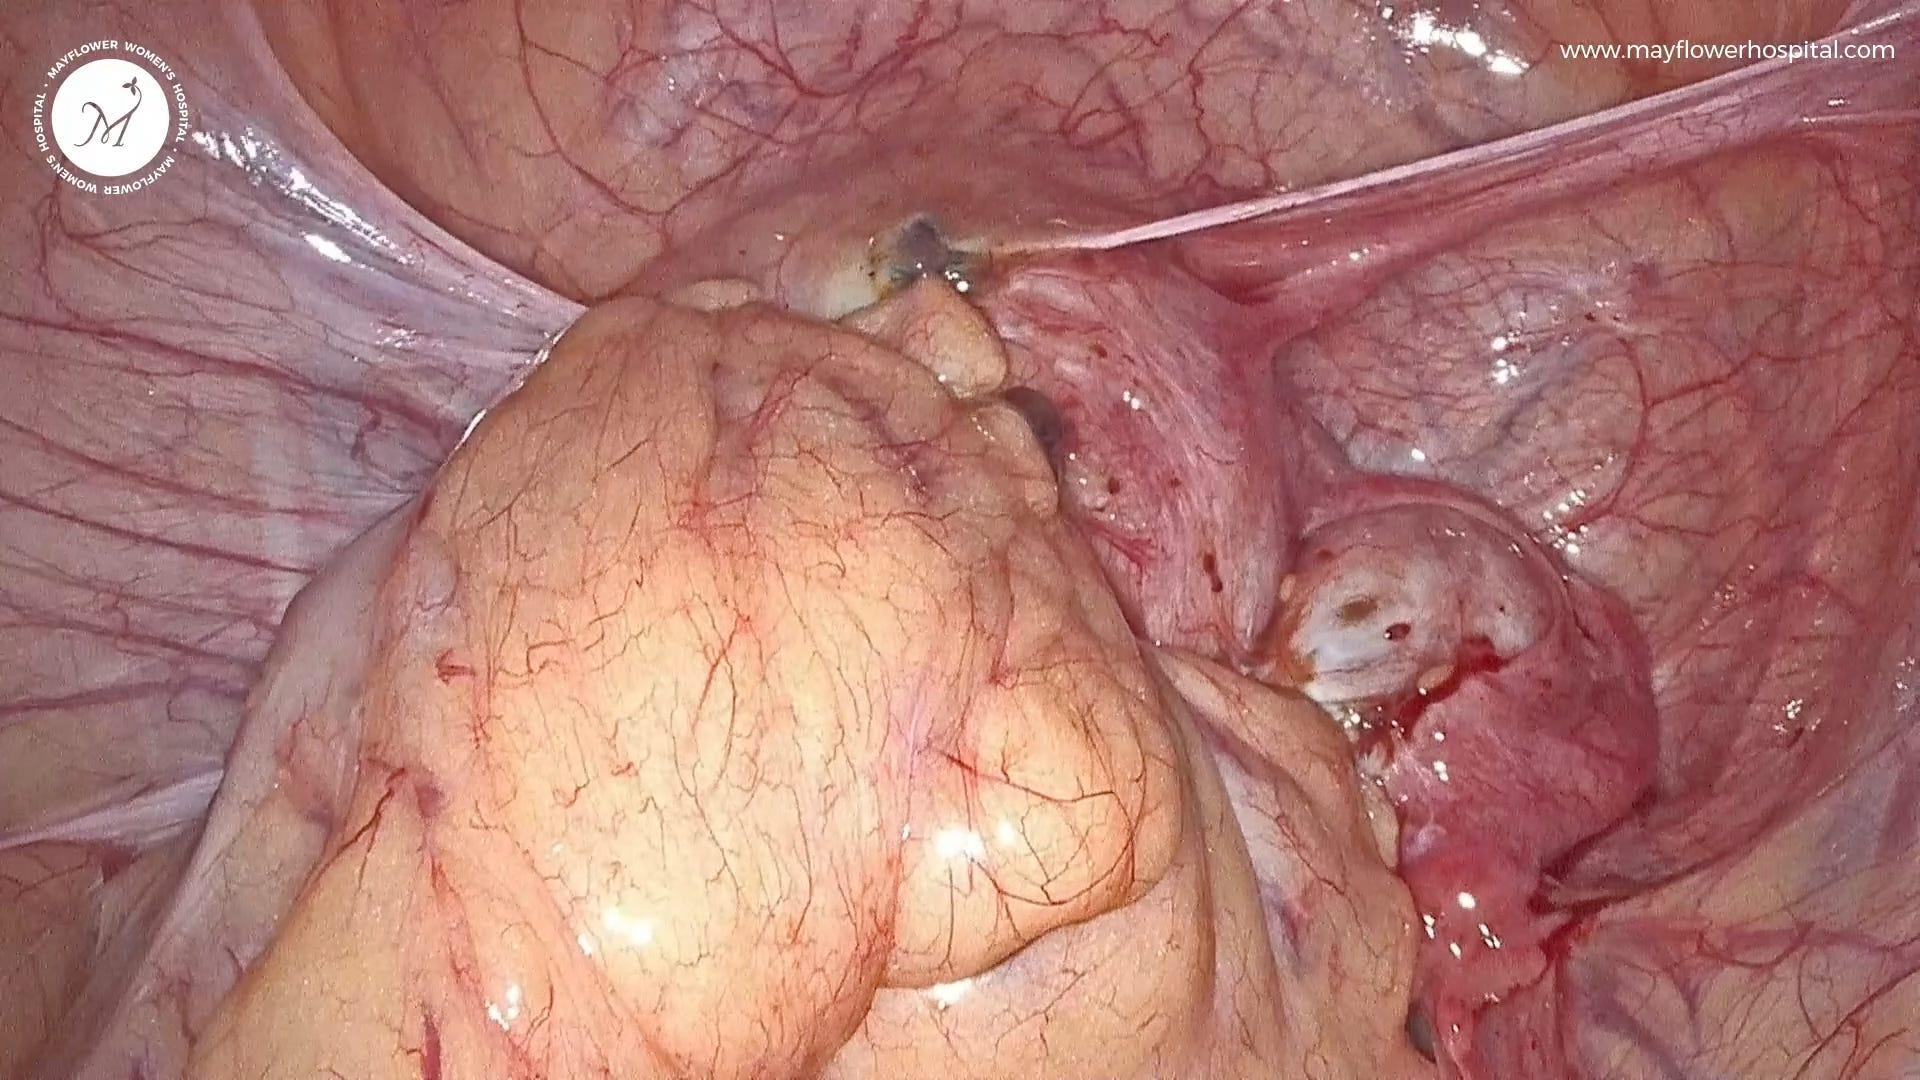
You would’ve observed how a ureter is always engulfed in vasculature, and constantly motile. Almost as though it was shrugging off any adhesions being formed on it. This is why instances of deep infiltration into the ureter, or what we call intrinsic involvement, are rare. What’s more common is extrinsic involvement, growth over the ureter circumferentially covering it, and in some cases even stricturing it causing hydroureter and often a partial or complete loss of the kidney.
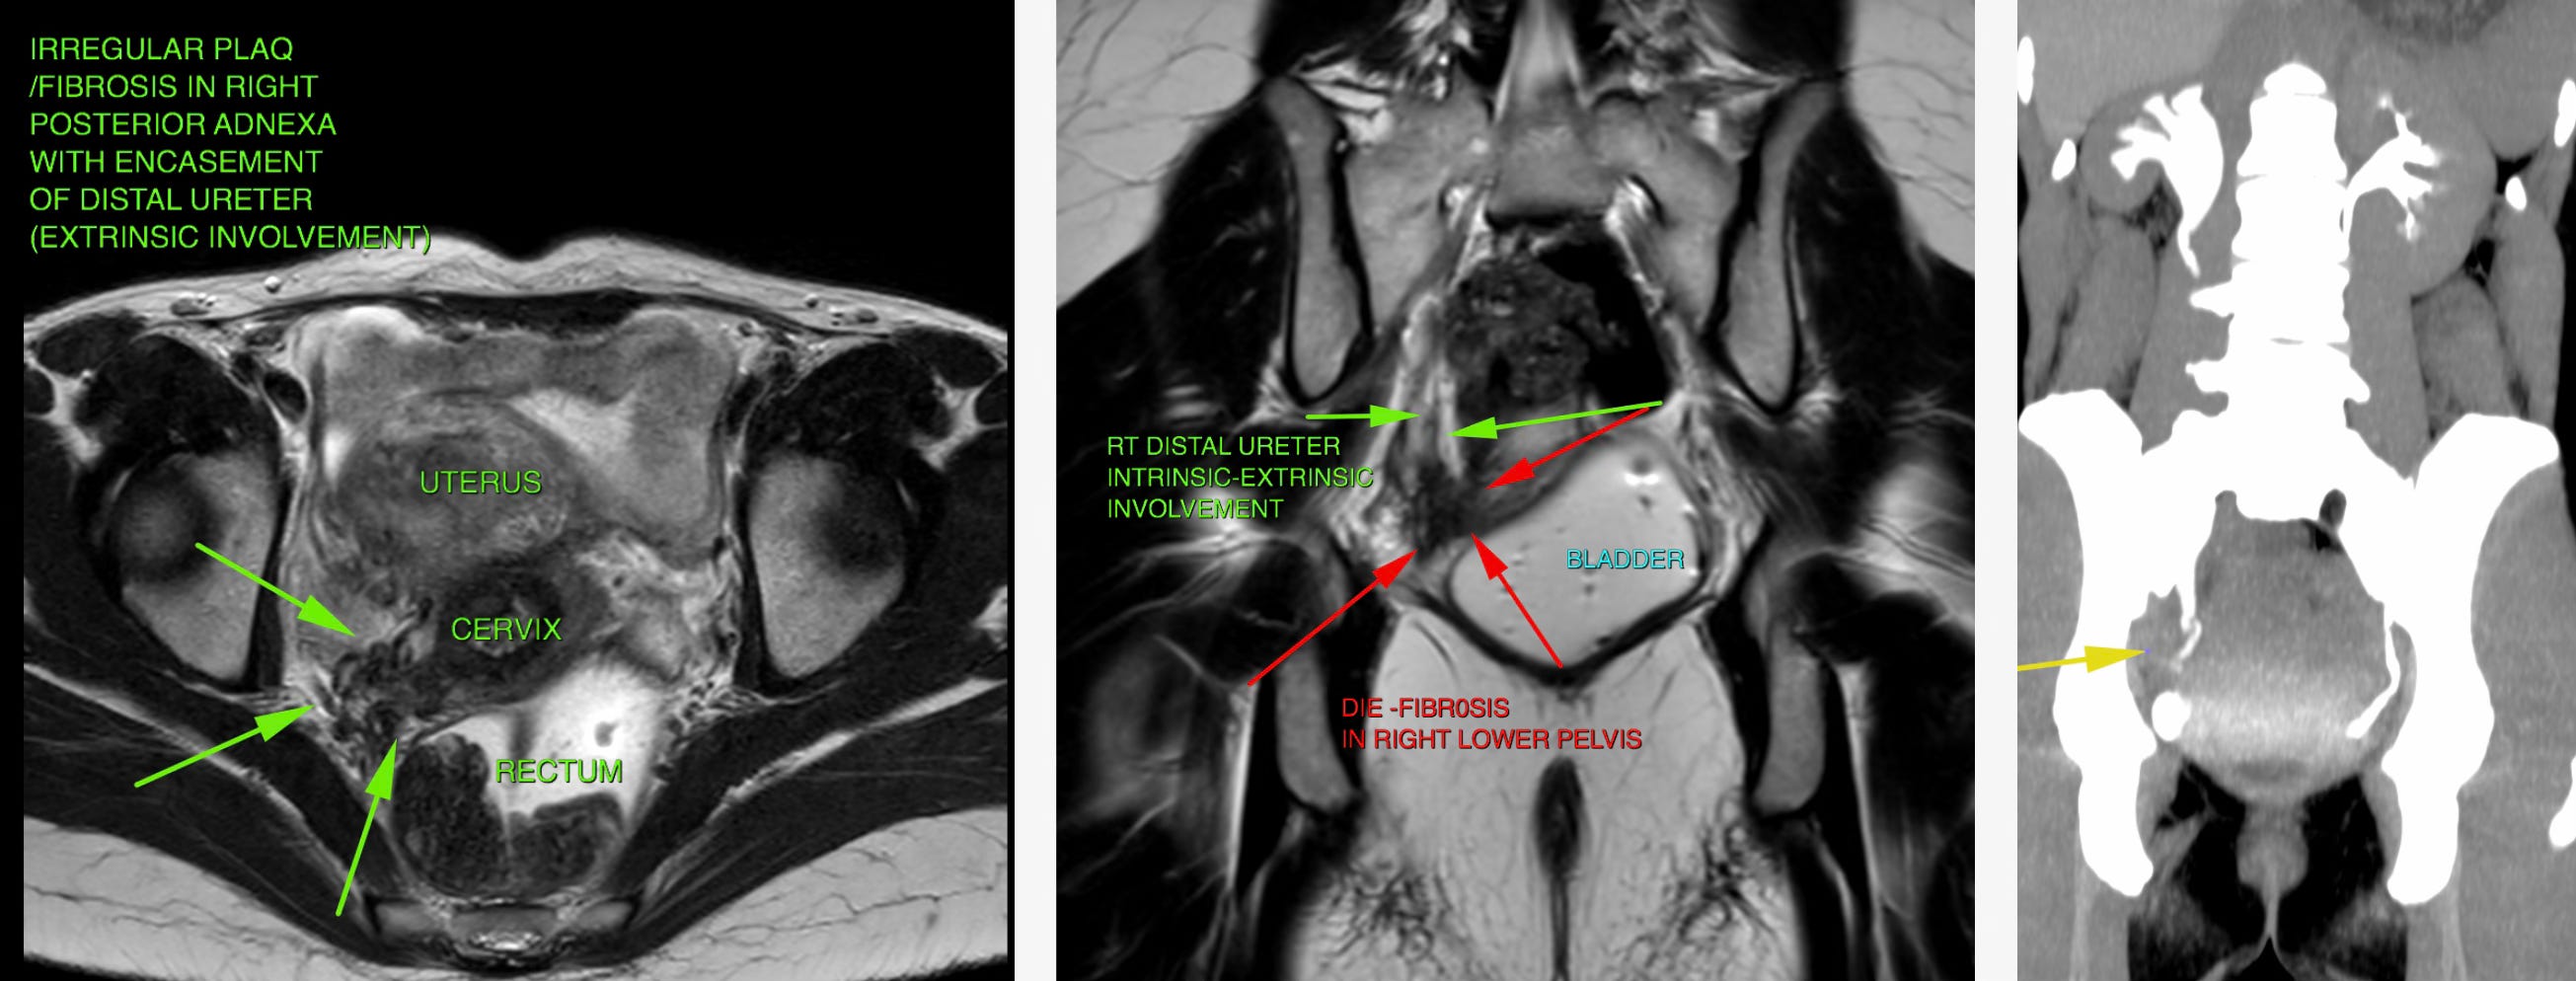
Good thing is that visualizing a ureter on MRI is easy. With a moderately filled bladder one can appreciate whether there has been any anatomical distortion to the ureter; it’s path as well as its own anatomy.
Based on this observation, we can estimate how intense the involvement could possibly be and prepare for it. Yet, however difficult the disease might be, because of how the ureter reacts to endometriotic tissue, growth always happens over it, layer by layer, like someone wrapping lots of rubber bands on a watermelon.

This layer by layer, fiber by fiber growth unlocks an important methodology to dissect the ureter. So let’s begin with what we came here for.
The Five Levels of Uretric Dissection
Level One - The Testy Tease
This is a case of near zero involvement. When you only need to identify the ureter, like in cases of radical hysterectomy, or when peritoneal implants of endometriosis are feeble and not too deeply infiltrating, or where the ureter is not involved in the disease and its mesentery is preserved. All you need to do here is isolate the ureter and move it away from your region of dissection.

Dissection here is simple. Just go upto the brim of the pelvis, lift the peritoneum, and place a knick in it. Provide lateral traction and countertraction while applying energy from your ultrasonic scalpel pulling the peritoneum up. This ensures the line of dissection will be parallel to the ureter and there’s a minimum possibility of heat transfer to the organ.
Next, we look at what happens when endometriosis starts getting nasty in the peritoneum.
Level Two - The Lasagna
Involvement of the peritoneum in the disease causes the superficial tissue to alter in nature and become hard to dissect. This is when we take a laminar approach. Remember how endo-tissue-growth happens layer by layer? Like a casserole of lasagna? That’s also how we dissect it. “Layer by layer.”
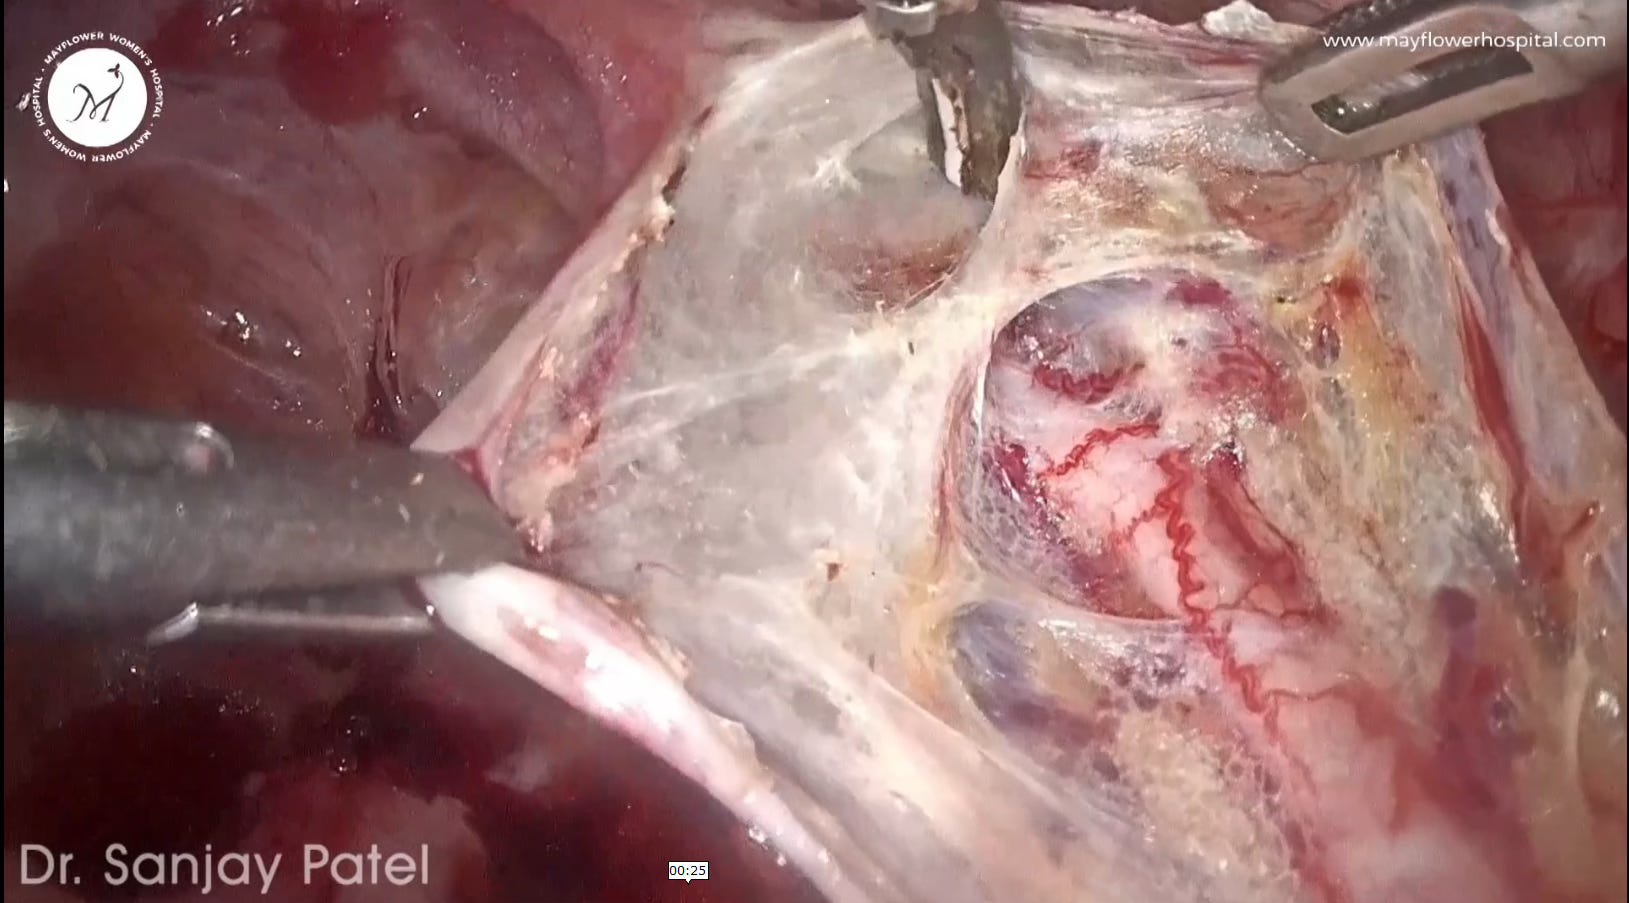
The first step, as always, is to be extra careful while performing the dissection. It’s hard to tell where the lasagna ends and the casserole (ureteric mysentry) begins. The second, is to dissect the peritoneum layer by layer, first removing the diseased tissue out of the way and then incising the remaining connective tissue to complete the dissection.
From here on, the waters get muddy. Endometriotic infiltration can go deep into the peritoneum and turn the tissue much harder to dissect. So much so that you almost hit a wall while performing a laminar dissection. This is when you move to level 3 or what I like to call the virgin gateway.
Level 3 - The Virgin Gateway
One reason for starting the dissection at the brim of the pelvis is also that this is where all the tissue converges. Meaning, all layers of the peritoneum tissue plus any layer of endometriosis tissue formed all come to this one point. Untying them from here is the easiest.
So when you run into a wall, or a hard tissue underneath that doesn’t give you traction, don’t worry, it’s just another layer. The best thing to do is return back to the point of convergence, or the virgin area above, go one layer deeper, and start dissecting again.

Upon reaching the hardened affected tissue, if we’re still unable to dissect on our tractioned plane, we repeat the process. Come back up, go down one more layer and dissect.
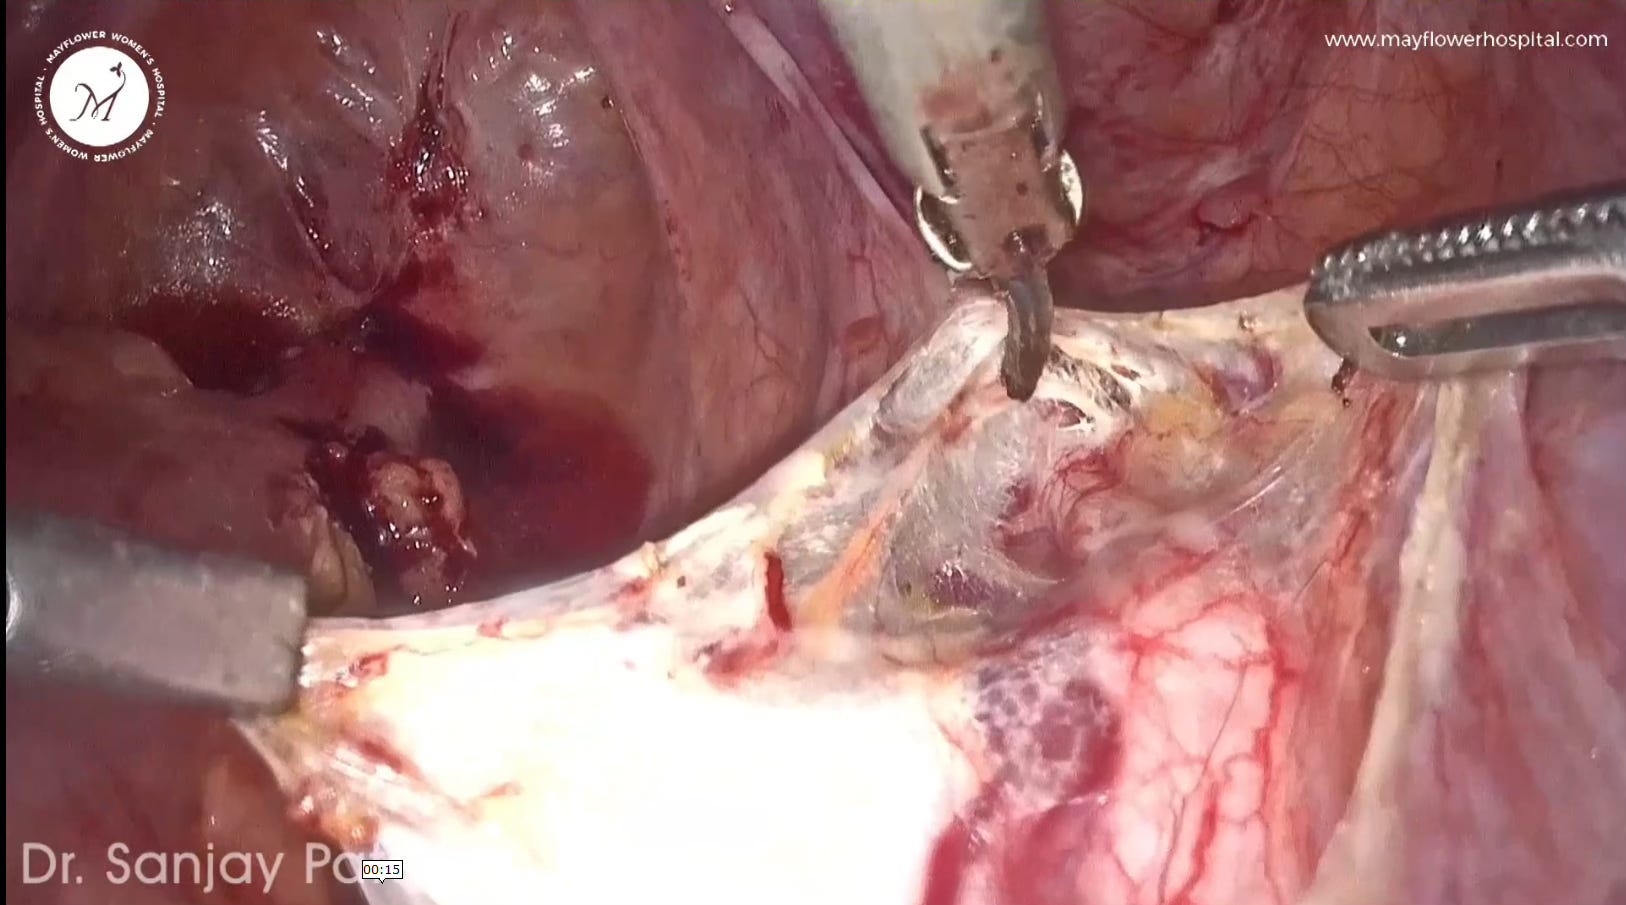
One important part of this procedure is the identification of pseudo layers around the ureter. These are layers formed naturally as a response to the growth of endometriosis tissue and act as important landmarks in the fiber by fiber dissection mentioned above. Each time we come back to a virgin area, we dissect down to the next pseudo layer, and begin again.
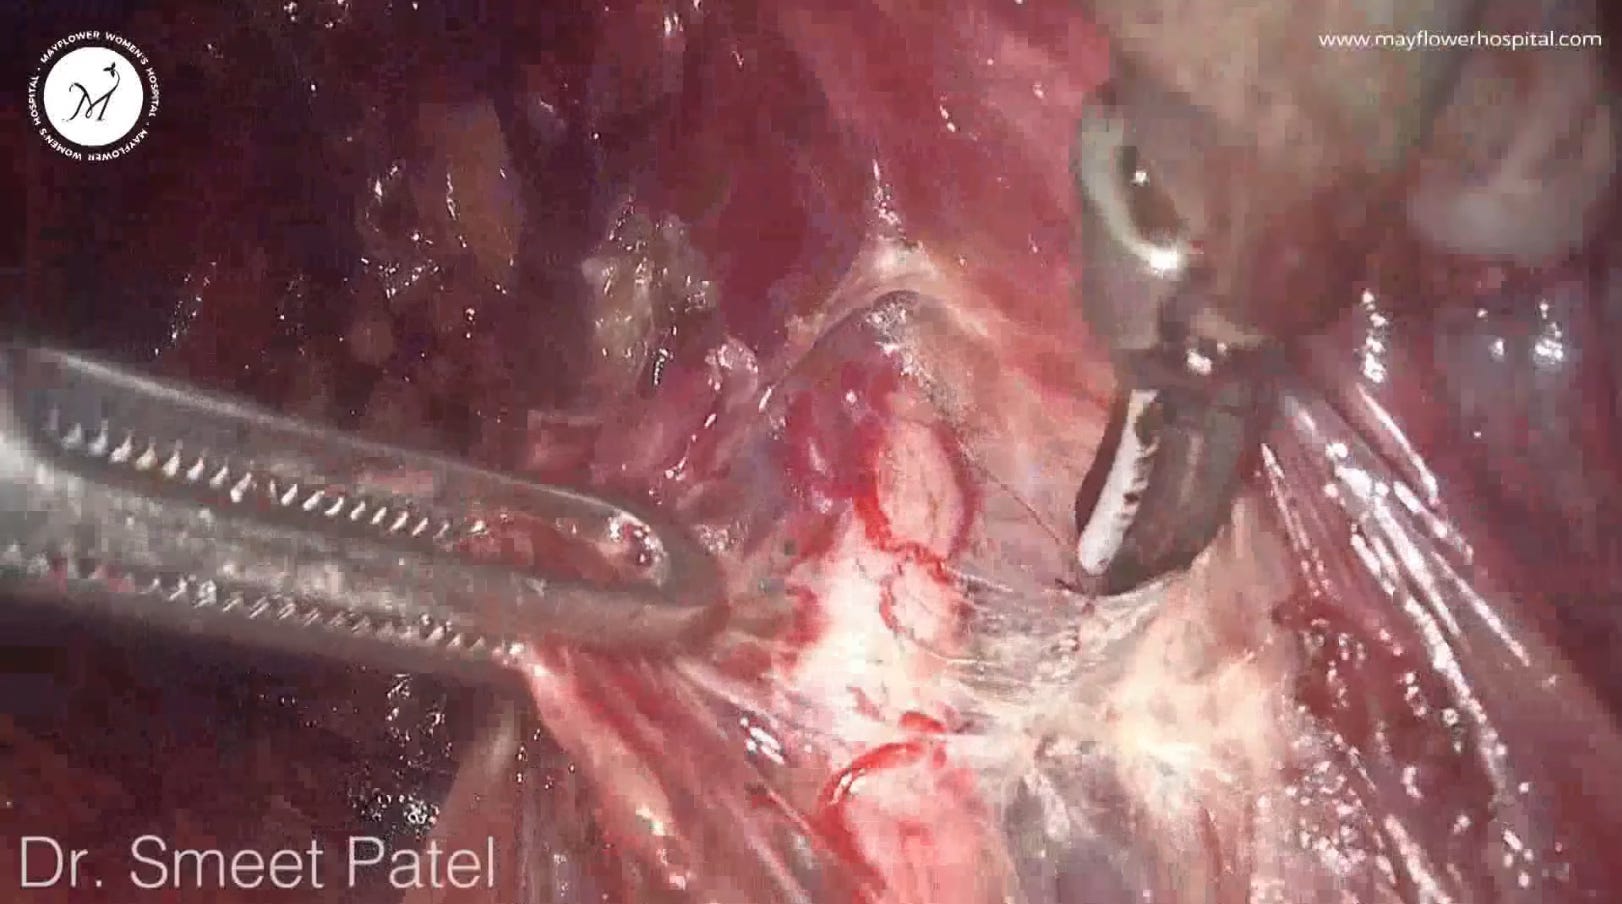
If done carefully. we will eventually reach a layer that hasn’t been infected by endometriotic nodules. This will help us create a small window between the infected tissue and the ureter. This is where we can insert an instrument like a closed grasping forceps to safeguard the ureter and then use an ultrasonic scalpel to remove the nodule using a vertical cut.
Beyond this is where we enter the big leagues of uretric dissection. Besides endometriosis, onco-tissue growth in the pelvis also sometimes requires us to perform a radical hysterectomy when indicated. Some of these cases require a thorough dissection of the parametrial tissue over the tunnel of wertheim, thereby bringing us to the fourth level of uretric dissection
Level 4 - The Wertheim Worry
For patients that typically undergo class 3 radical hysterectomy, the whole parametrial tissue has to be removed over the ureter. This radical approach dictates that we be thorough and uncompromising with disease removal but still preserve vital organs. Here are the steps that we follow
Remove all parametrial tissue over the ureter in patients undergoing class 3 radical hysterectomy.
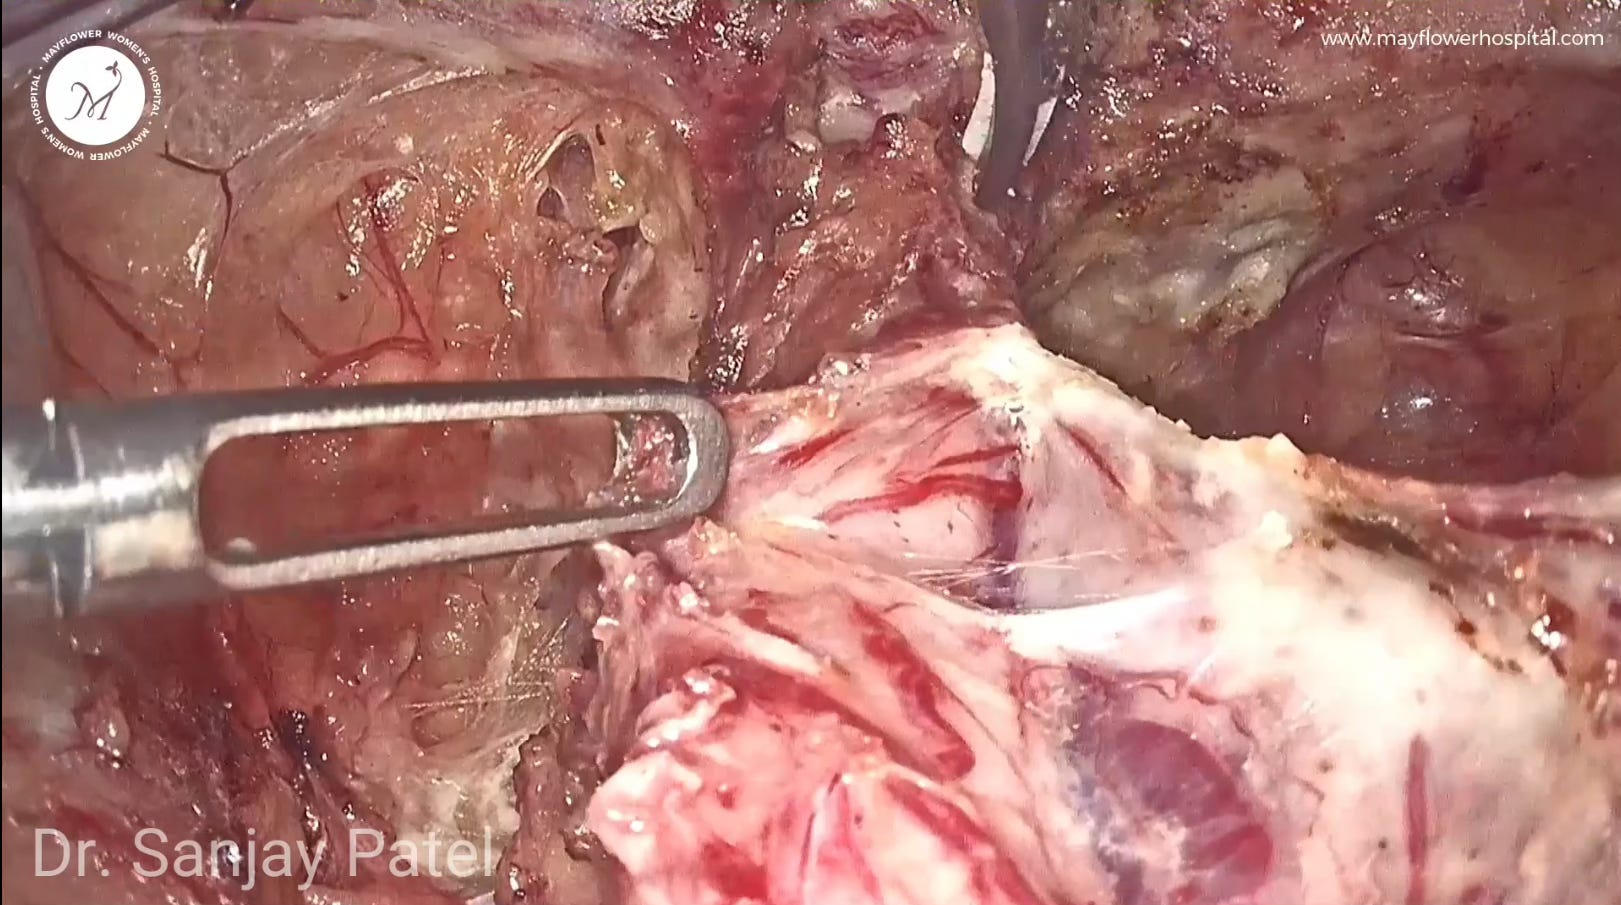
Skeletonize the coagulated uterine artery up to the Tunnel of Wertheim, with the ureter positioned just below.
Ligate the artery at the Wertheim tunnel.
Employ sharp, fiber-by-fiber dissections within the Tunnel of Wertheim to separate the uterine artery from the ureter, using the free end of the artery for traction.
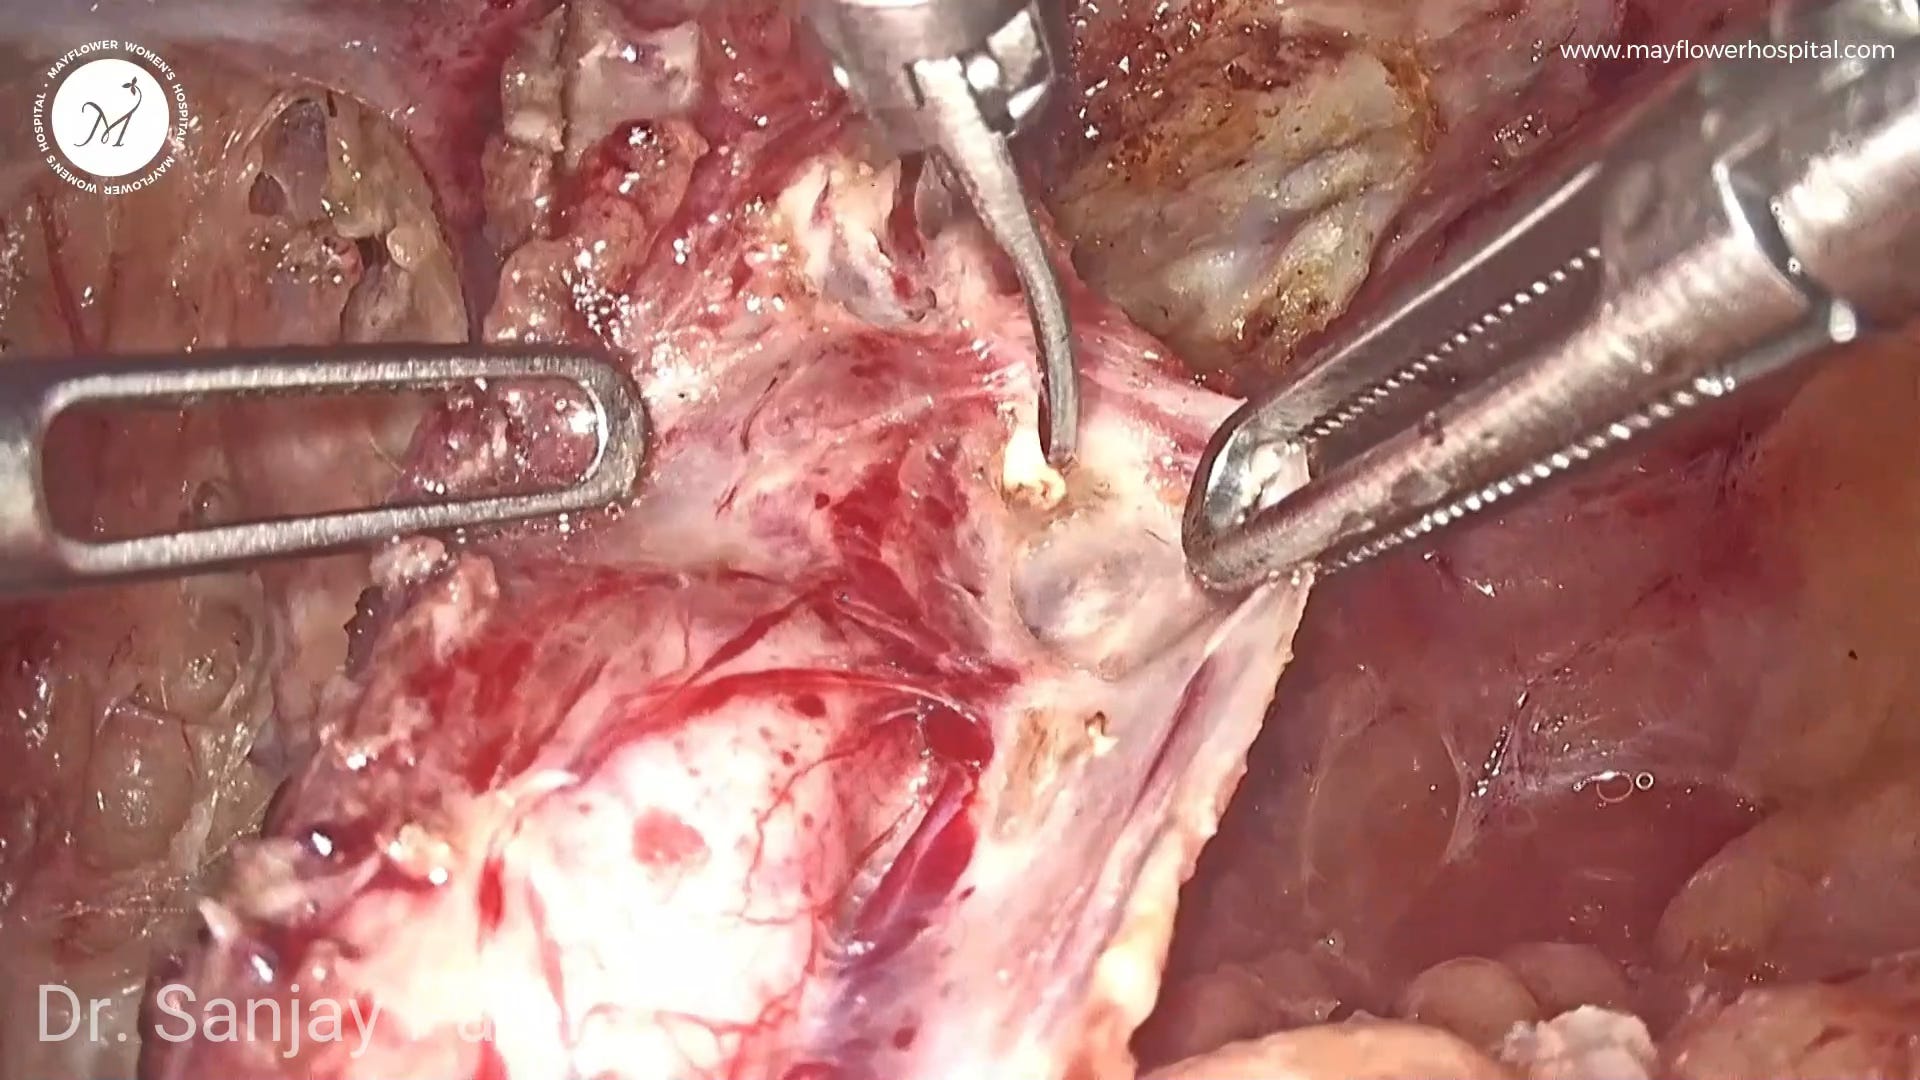
Trace and dissect the ureter through the parametrium, dividing the parametrium superiorly and laterally to the ureter and mobilizing it medially to expose the ureter's insertion into the bladder.
Retract the ureter as far laterally as possible and divide the parametrium at the sidewall.
Complete the procedure by skeletonizing the ureter from the pelvic brim to its bladder insertion.

This dissection is further complicated by the endometriotic involvement of the parametrial tissue. The resulting tissue growth can heavily alter anatomy, or in some cases cause fatal restrictions of the ureter. This is where we enter the fifth and last level of uretric dissection
Level 5 - The Choke Hold
Heavy tissue growth in the tunnel of wertheim’s or the ureteric tunnel often results in an occlusion of the ureter. Nodules grow radially inwards in the tunnel to a point where they begin to constrict the ureter leading to hydroureter and eventual hydronephrosis upstream.
Observed in cases of deep infiltrating endometriosis, this level of dissection requires extreme caution, and care. When using an energy source, the biggest risk we run is thermal injury to the ureter. In our case this energy source is an ultrasonic scalpel. While dissecting off the diseased parametrium, there are three extremely important steps that must be kept in mind at all time
Use proper traction and countertraction to ensure the correct dissection plane is revealed. Loose tissue can lead to dissection errors, especially near the ureter where thermal injury is a risk.
Handle the ureter with care, particularly since it may be fragile and prone to damage due to stricturing and hydroureter. Extra caution is required to avoid injury from even simple actions like grasping.
Proceed delicately once the correct dissection plane is established. Utilize the tip of the ultrasonic scalpel to grasp, activate briefly, then flick and release nodules to minimize lateral thermal spread and focus actions only on the infected tissue, ensuring slow and precise movements.
Surgeries for Endometriosis are always complex. You’re always dealing with a distorted anatomy. Things aren’t where they’re supposed to be and very often hard to find. Nothing’s more important than being mindful of every step we take. Every cut comes with a consequence.
That sums up the five levels of ureteric dissection. From completely disease free, to constricted and altered. Each level needs a new set of skills, each level demands from the surgeon more patience, care, and confidence. Our YouTube video on this topic also comes the surgical steps involved. You can watch it here
With this, we hope as a gynecologist, you find more confidence and courage in dealing with the next uretric involvement you encounter. Remember, if you have questions, you can leave them in the comments below or email us on ew@mayflowerhospital.com
See you next week! ❤️
Special thanks to Dr. Baishali Jain for editing this newsletter and gathering the best images to help illustrate the steps.
 | A guest post by
|
 | A guest post by
|